 |
CENTRE
OF PUBLIC EMPLOYMENT SERVICES OF SOUTHEAST EUROPEAN COUNTRIES |
|
PES
ADMIN - HELP |
||
INSTRUCTIONS
FOR PES ADMINISTRATORS |
Introduction
[
Contents ] [
Next ]
According to the assumed obligations of the presiding member for 2008, the National Employment Service of the Republic of Serbia (NES) has taken appropriate steps with a view to designing the dynamic website. International domain cpessec.org has been registered. CPESSEC is the acronym from CENTRE OF PUBLIC EMPLOYMENT SERVICES OF SOUTHEAST EUROPEAN COUNTRIES. As a model for design and organisation of this website, we used the official presentation of WAPES (World Association of Public Employment Services). Address of the site is: http://www.cpessec.org/
The purpose of this presentation is to establish an efficient and quality exchange of data and current information between the PES members. The adopted concept enables all members to enter and edit the current information as well as to redirect to their respective home websites, where it is possible to publish more comprehensive information in some of the used formats such as HTML, PDF, DOC, PPT and the like. This concept ensures even participation of all members and provides sound basis for further joint development, improvement and increase of the functionality of this website.
Each member was obliged to nominate one or more persons for the tasks of administrator, who are given all necessary mandates and authorisations. In this way, entering of the current information that is considered important to other members is enabled.
This instruction is intended primarily for the authorised administrators. Particular attention in designing and realisation was paid to the PES Admin module, which is envisaged for the authorised administrators. Following the login, PES administrators are able to see all their respective data. The data can be edited or deleted. At any moment, it is possible to add new data of the class Activity, Project, Document or Expert Contact. In order to increase the safety, all administrators are able to change their own password at any time.
Tasks emanating from the lifecycle of this dynamic website can be separated into two basic groups:
The first group comprises the tasks performed by the designer and webmaster of www.cpessec.org and are related to everything connected to web programming and programme interventions in the site: optimisation, designing, creation, piloting and introduction of new programme modules, expansion of the data structure as well as regular protection of the database, including creation of the required technical documentation.
The second group comprises the tasks and activities performed by the authorised PES administrators. These tasks will initially be smaller in scope and will include entering (and if needed editing and deleting) of data of the classes Activity, Project, Document or Expert Contact. After a certain period of time (determined internally by each PES member), every PES Admin will be authorised to transfer the data from the active zone into the zone designated for archiving. PES administrator of the presiding member will have somewhat more tasks to perform when and if the decision to launch the forum in the site is passed, and it will include monitoring of the forum and protection of data.
At this point, our common site is already launched in the Internet and ready to use. If in practice it turns out that we need to support a new data class – it will be introduced. Considering that there are technical conditions now, it will be possible, with application of XML and RSS technology, to provide a higher degree of information and a higher level of data exchange among the member countries. Any new suggestion or idea regarding the website is welcome.
Login [
Prev ] [
Contents ] [
Next ]
In order to start working, you need to log in. In the vertical menu on the left-hand side there us the link for the option PES Admin, which is intended for the administrators.
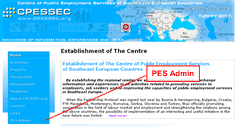 |
Click on the option PES Admin at the bottom of the menu. You will see a new page with a special login form. It is sufficient to enter your User Name and Password and to click the Login button, which will send your registration data to the server. Important note: In order to enhance the security, the system distinguishes between the capital and small letters during login, so we recommend turning off the CAPS LOCK on your keyboard during login. |
Click on the option PES Admin at the bottom of the menu. You will see a new page with a special login form. It is sufficient to enter your User Name and Password and to click the Login button, which will send your registration data to the server. Important note: In order to enhance the security, the system distinguishes between the capital and small letters during login, so we recommend turning off the CAPS LOCK on your keyboard during login.
If your login information is correct, the server will forward you
to a special page, which is “invisible” to other visitors.
That is a special CONTROL PANEL, intended for Administrators. The options
and possibilities in the CONTROL PANEL will be discussed in the next chapter.
This concludes the short login procedure and you can start working. Duration of the connection is limited to 60 minutes for security reasons. After the expiry of this period the application will notify you about that and redirect you to the homepage. Of course, if needed, you can enter the option PES Admin and log in again. The number of logins is not limited.
Please take the responsibility for the secrecy of your password. If at any moment you believe that the secrecy of your password is jeopardised, we suggest you change it immediately. The procedure for changing the password will be explained in the following pages of this instruction.
xxxxxxxxxx1
- Bosnia and Herzegovina
xxxxxxxxxx1 - Bulgaria
xxxxxxxxxx1 - Croatia
xxxxxxxxxx1 - Hungary
xxxxxxxxxx1 - Macedonia
xxxxxxxxxx1 - Montenegro
xxxxxxxxxx1 - Romania
xxxxxxxxxx1 - Serbia
xxxxxxxxxx1 - Slovenia
xxxxxxxxxx1 - Turkey
Finally, we are attaching the list of all registered PES Admin
accounts. The valid passwords are not shown for obvious reasons. All accounts
end with the number 1. This is the result of the possibility for some
members to delegate more than one PES Administrator. To begin with, until
the system has taken off to smooth operation, we suggest that every member
should have only one PES Administrator.
Control Panel [
Prev ] [
Contents ] [
Next ]
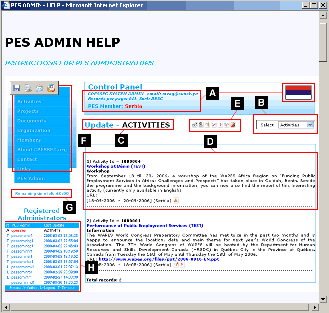
After the registration (LOGIN procedure), the authorised users can see a specially designed page. We named it CONTROL PANEL – because it is the main page of our PES Admin - interface. From that page it is possible to start any of the envisaged activities. The figure below shows the outline of the currently valid CONTROL PANEL. In the figure, the most important parts of CONTROL PANEL are marked by capital letters A to H.
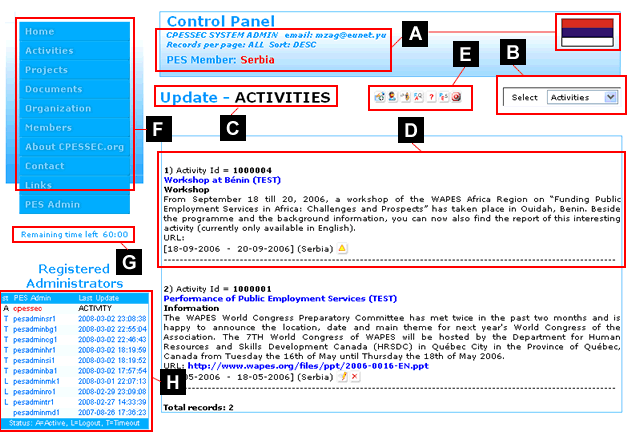
In all successive parts this instruction, we will refer to the marks given in this figure. Now we will give short descriptions and role of each of the marked blocks of data:
Block A - Identification [
Contents ]
This block of data is related to personalization of the PES Administrator and can comprise the basic information such as the name, surname, phone number, email. Moreover, the name of the country is also written in red letters. The right corner also shows the national flag of the respective member country.
In addition to this information, data such as Records per Page and Sort are presented, showing how much data will be given per one page and the way this data will be sorted. You will be able to change these parameters by yourselves through the option Profile, which will be explained later – when the options from block E are described.
Block B – Select
[
Contents ]
This is a simple menu to select one of the currently available classes of data to update.
 |
The procedure is simple. By clicking the arrow or the current option, you will be shown a drop down menu just like the one on this image. You will see four available classes of data: Activities, Projects, Documents and Contacts. By simply clicking, choose the wanted type of data (for instance Documents – as in the image). Afterwards, you will be shown the CONTROL PANEL page again, but the focus will be on the class: Documents. If the number of available classes of data increases in the future, the logic of the CONTROL PANEL will remain the same, and only instead the (currently) four, you will be shown five or more classes of data. |
Blocks C and D [ Contents ]
If indeed we select the option Documents, the block C
on the new CONTROL PANEL page will have a new value and it will read:
![]()
In addition, block D will also from that moment begin to show the current status of your data of the class documents. In case you have no entered documents, CONTROL PANEL will read the following:

If this is your case, you have two possibilities. The first one is to enter a new document and the other one is to select another class of data.
Block E [
Contents ]
![]()
This block uses the icons to represent the available options, some of which are very important for performing the administration tasks. The designer reserves the right to change the order of the icons, to add or delete certain options if necessary.
![]() - Add [
Contents ]
- Add [
Contents ]
Please, memorise this symbol. This icon (with the arithmetic sign +) is
used as a universal entrance into the option for adding new input. The
subject of addition is dynamically defined. If you have previously selected
projects, you will enter the option to add new projects by clicking this
icon. In case the focus was on the activities, by clicking this icon you
will enter the option for adding new activities. This rule also applies
for all existing data classes...
Every PES Administrator can freely update their basic information such as the name, surname, phone number, fax, email... In addition, we have concluded that it is useful to enable the administrator to define the number of shown data in the CONTROL PANEL as well as the rule of sorting for every class of data separately.
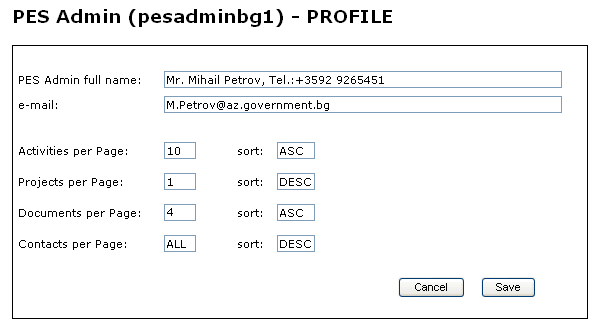
For each of the data types (Activities, Projects, Documents and Contacts) PES Administrator can define two parameters.
Prvi parametar (per Page) definise broj slogova koji se prikazuje na stranici kontrolnog panela. Ako je njegova vrednost ALL tada se prikazuju svi podaci na jednoj stranici. U slucaju da je njegova vrednost neki broj koji je veci od nule, na svakoj stranici ce biti prikazano upravo toliko podataka. Ako je ova opcija aktivirana, na kraju stranice ce se pojaviti linkovi za (First) (Previous) (1 2 3 4 5) (Next) (Last), stranice kao sto je uobicajeno na internetu.
The first parameter (per Page) defines the number of syllables shown in the Control Panel page. If its value is ALL, then all data is shown on one page. In case its value is a number higher than zero, each page will show that much data. If this option is activated, links will appear at the bottom of the page for (First) (Previous) (1 2 3 4 5) (Next) (Last), pages as is customary in the Internet:

Pes Administrator can select the sorting method for each of the above data types. The second parameter (Sort) can be set to ASC (ascending) and DESC (descending). ASC means that the last entered piece of data will be shown at the bottom of the list. DESC means that the last entered piece of data will be shown at the top of the list. Of course, if your address or email is changed, it is useful to enter that change. At the same time, we hope that Mr. Mihail Petrov will not mind us using his personal data as an example.
![]() - Change Password [
Contents ]
- Change Password [
Contents ]
By clicking this icon, you have the possibility to change your password
on your own. The name with which you are registered cannot be changed
for the time being. This will be enabled if the need for such a thing
should arise in the future. However, you will be able to change your password.
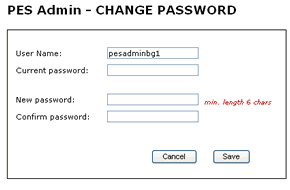 |
You have most certainly had the opportunity to use the option for changing the password in other application or in the Internet. The structure of data in the form is simple. You need to enter the existing password and then enter twice (for confirmation) the new password. Having completed this step, your new password will be memorised by clicking the SAVE button. Please memorise it. Once again, we must ask you to take the responsibility for the secrecy of your password. As soon as you suspect that the secrecy of your password might be jeopardised, use this simple option to change it. |
![]() - Change PES Member Profile [
Contents ]
- Change PES Member Profile [
Contents ]
This option enables quick and easy way to change the
information about the PES Member. Currently, the change involves data
about the official name of the PES Member, information on the director
general and the main contact person. By entering this option, you will
find a filled in form as outlined in the image below:
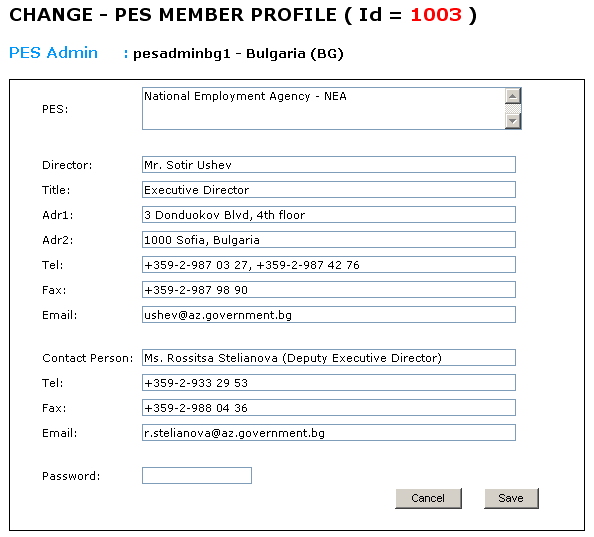
The first two fields (PES and Director) are compulsory fields. Other fields
are not compulsory. If currently you do not have the correct information,
enter N/A. By doing so you will show the system that you have not forgotten
to fill in some of the remaining fields. When you have obtained the correct
information, re-enter this option and replace N/A with it.
In the end of the form, there is the Password field. In order to edit the entry in the PES Member Profile, you also need to enter the corresponding password. You should remember that the password used for the login procedure and the password used for entering data in this form – can be different. Initially, in order to facilitate your work in the beginning, these two passwords are the same.
![]() - PES Admin – website [
Contents ]
- PES Admin – website [
Contents ]
By clicking this icon, PES Administrator opens a new page of his/her browser
and goes to the homepage of the website of his/her home organisation.
We thought it would be useful to implement this option considering that
according to the current concept, different documentation will be stored
on the local websites – and cpessec.org will contain only links.
We hope that this option will prove to be useful in practice...
![]() - FAQ [
Contents ]
- FAQ [
Contents ]
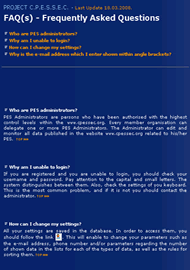 |
You have often had
the chance in the Internet to see the option Frequently Asked Questions
and answers (in short: FAQ). We have envisaged that cpessec.org
should soon have this option, which will be started by clicking
the icon In the initial stage, this part will comprise a smaller number of questions that we expect to be asked by you. Later, as it develops, it will comprise your actual questions and the problems possibly encountered in practice – with answers, of course We believe that the database of useful information will in time grow in volume and quality and that this option will prove very useful in practice. |
![]() - Help [
Contents ]
- Help [
Contents ]
 |
It is our intention
in the foreseeable future to enable the PES Administrators to open
the page that contains instructions by clicking this icon |
![]() - Logout [
Contents ]
- Logout [
Contents ]
By clicking this icon, you will end your connection (session) and the
system is ready. Termination of work by using this option is considered
as the proper exit from the application. More details about this option
can be found in the last chapter – End
of session.
Block F [ Contents ]
 |
In the CONTROL PANEL, block F is the standard CPESSEC menu system that also occurs on all other pages of this application. It is important to emphasise that all available options of the application are available to you at all times. This can be very useful in cases when you are entering new data or editing existing data – and when after updating you wish to see the entered data through the eyes of a common visitor. When you have finished inspecting the layout, it is sufficient to re-enter the PES Admin option. The system will recognise you as the authorised administrator and skip the login procedure. In addition, the CONTROL PANEL will again be activated at the exact place where you left it. |
Block G [ Contents ]
This part of the CONTROL PANEL is envisaged for provision of information to the administrator about the remaining time of duration of his/her session.
| |
The time is presented in a common way – in the format mm:ss. We remind you that one session is limited to 60 minutes. The number of sessions is not limited. |
| |
In case your remaining time of the session is less than 15 minutes, the system will show the remaining time in red colour as in this example, as a warning. |
Recommendation: If the “Remaining time
left” is shown in red colour, and you have the need to
work longer, the safest way is to log out by clicking the icon ![]() and then log out again. By doing so, you have secured another interval
of 60 minutes and the entire procedure of logout and re-login lasts less
than 30 seconds.
and then log out again. By doing so, you have secured another interval
of 60 minutes and the entire procedure of logout and re-login lasts less
than 30 seconds.
Note: information about the remaining time
is for the time being shown only in the CONTROL PANEL.
Block H – Registered Administrators
[
Contents ]
This block of data is also shown only in the CONTROL PANEL and it is informative in character.
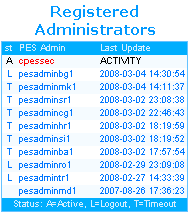 |
This
table shows the current information about the status of all registered
administrators. For the purpose of easier navigation – your
connection will be marked by red colour. |
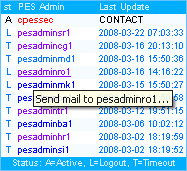
In addition to the information about the activities of PES Administrators, this list offers the possibility to send an email in a simple way to some of the administrators in the list. By moving the cursor over the list, the information about the administrator you are indicating with the cursor will be shown in the status bar.
![]()
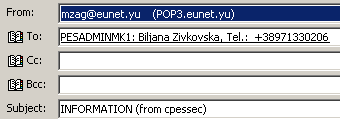
It is enough to click the chosen link and you will start the default programme in your computer for sending emails. In most cases this will be Outlook Express. The system takes the name and surname from the database and pastes it into the field . In addition, in order to avoid confusion, the system will also read your user name within the Subject field in the brackets. In our example in the image: INFORMATION (from cpessec).
 |
 |
We believe that this possibility will facilitate communication between PES Administrators. Please note that it is not necessary to remember the email addresses of your colleague administrators, as they will be available to you at all times while you are in the CONTROL PANEL.
Updating Activities [
Prev ] [
Contents ] [
Next ]
 |
Firstly,
by using the Select menu (explained within the CONTROL PANEL, presented
as block-B) you should select Activities. Do this by clicking once on this option. Afterwards, you will find yourself once again in the homepage of CONTROL PANEL, which will show you the list of all your activities in the database. In case your database of activities is empty, an empty list will be shown. |
Straight away, we must stress that we will be somewhat more comprehensive in the part regarding the updating of Activities, whereas in relation to updating Projects, Documents and Contacts we will give only the short instructions and possibly some needed explanations.
A reminder: regardless of the data class you have selected
to update, you also have available at all times the palette of options
explained in the block – E CONTROL PANEL.
![]()
(This need not necessarily be the final appearance –
the designer reserves the right to change the appearance of the icons
as well as their order with the purpose of optimisation of the user interface
for PES Administrators)
Most of these options are dynamically adjusted to the
current choice of PES Administrator. This particularly goes for the first
option marked by the icon ![]() .
It represents the entry into the option ADD. If you have previously selected
Activities – by clicking this icon you will enter the option for
adding new Activities. In case you have selected the class Projects in
the Select Menu, by clicking the same icon you will open the form for
adding a new Project. The same goes for all other classes of data (Documents
and Contacts).
.
It represents the entry into the option ADD. If you have previously selected
Activities – by clicking this icon you will enter the option for
adding new Activities. In case you have selected the class Projects in
the Select Menu, by clicking the same icon you will open the form for
adding a new Project. The same goes for all other classes of data (Documents
and Contacts).
Adding new Activity [
Contents ]
We presume that you have no activities entered. By entering the option for updating activities, you will be shown the screen with more or less this content:

If you wish to add a new activity, it is enough to click the icon and you will be shown the following form:
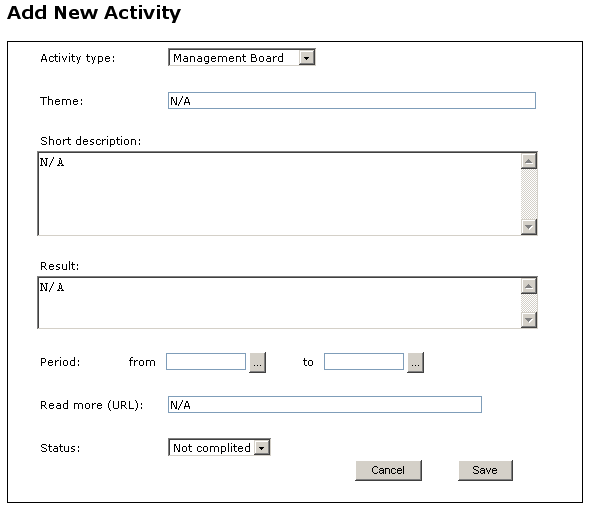
It is necessary to fill in the form carefully. The first and the last
field end in a graphic symbol ![]() .
.
By clicking the icon ![]() you will open the list of offered values for the respective field. The
value that you select initially, when adding a new activity, can be changed
later.
you will open the list of offered values for the respective field. The
value that you select initially, when adding a new activity, can be changed
later.
Field: Activity Type [
Contents ]
| Select one of the offered values for the ACTIVITY TYPE which best corresponds to the nature of the activity you wish to add. The type of activity can be designated one of the following values: | 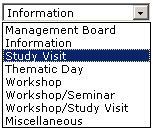 |
Field: Theme [
Contents ]
The size of this field is limited to 254 characters. The name of the activity is a compulsory piece of information. This means that, in case this information is not filled in or it is filled in with N/A, the programme for control will consider this a mistake and you will return to the previous page to complete the information.
Field: Short description [
Contents ]
The short description of activity is also a compulsory field. In this place we suggest that you enter several sentences of text, which gives the summary of the activity in question. The size of this field is not limited.
Date fields: Period from and Period to
[
Contents ]
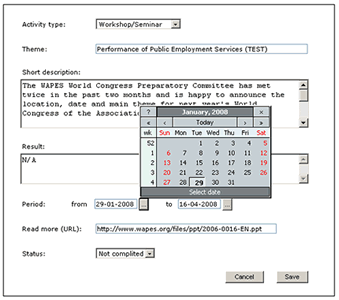 |
In the date fields, by clicking the icon
Please note that it is compulsory to enter the date. Of course, the more information is entered “image” about the activity you wish to present, it will have more quality. This is the only reason why in this form (nor in other forms) we did not mark the compulsory fields. |
Field: Read more (URL) [
Contents ]
This field can be useful if you want to provide additional information to the future visitors about the activity you wish to present. The type of data URL also occurs in the data class Projects and Documents and will therefore be here explained in detail. URL is the acronym from Uniform Resource Locator and it is the link towards an object in the Internet. This object can be a website, an HTML page, a PDF file, a word document of the type DOC or a Power Point presentation with extension PPT. URL can also refer to an archive of the type ZIP or RAR which can comprise different types of documents. It is important to remember that this is NOT A COMPULSORY piece of information. If you think in the beginning that it is complicated to use this field, it is enough to leave the default value N/A and skip it. Later, through the option for changing, you can enter the correct Internet address. It is also important to remember that if there is a link, it must be in the stipulated form. Here is an example of a correctly entered address: http://www.wapes.org/files/ppt/2006-0016-EN.ppt
In near or far future, it will also be possible to archive texts directly in the common website of the centre www.cpessec.org by means of the UPLOAD function. The reason for not enabling this option immediately is the impossibility to assess the volume of this documentation considering that we hired relatively modest resources for the purposes of this project.
For the time being we recommend the following scenario: If you wish to add a pre-created document to an activity, the most secure way is to forward this document to the webmaster of your PES website with the request to put it (anywhere) in the website. It would be best to ask him/her to create a cpessec folder and put all the files that you send to him/her in the future in this folder. Once the document is put up, it is enough to memorise its URL by means of the option Copy Shortcut and move it with the option Paste in the field Read more (URL).
Field: Status [
Contents ]
 |
Finally,
we are at the last field in the form. By clicking the icon you will
be given to select one of the three offered values within the field
ACTIVITY STATUS... |
If you have suddenly changed your mind and wish
to abort entering the new activity, use the button ![]() .
By clicking Cancel, you will return to the CONTROL PANEL without having
added the new activity. In case you want the entered data to be memorised,
click the button
.
By clicking Cancel, you will return to the CONTROL PANEL without having
added the new activity. In case you want the entered data to be memorised,
click the button ![]() and confirm that. It is important to emphasise that the activity you have
entered becomes visible for all visitors of www.cpessec.org, therefore
be very careful.
and confirm that. It is important to emphasise that the activity you have
entered becomes visible for all visitors of www.cpessec.org, therefore
be very careful.
Edit activity [
Contents ]
In case you have several activities entered, they will be shown in the CONTROL PANEL, as presented in the following example:
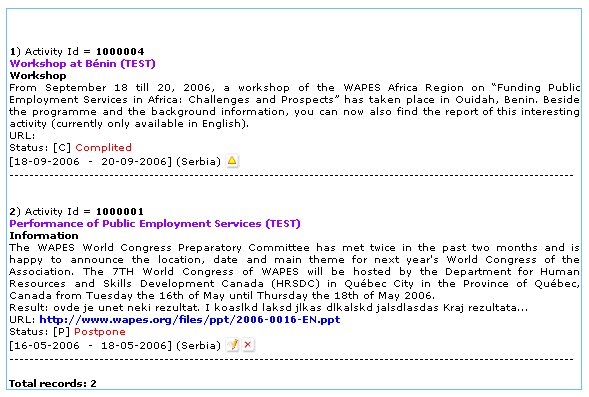
Every PES Admin has the authorisation to edit or delete ONLY the data
they have personally entered. In case that one member has more than one
registered PES Administrator – each of them can edit their own entries
unlimited number of times (as well as delete them). However, these options
are not allowed for the data that were not initially created by him/her.
For that reason, we have introduced the icon ![]() the purpose of which is to give you a visual warning that the respective
entry is not yours. Of course, it there are no registered PES Administrators,
this icon will not pop up. In the example in the previous image, we can
see three new icons which will here be explained in detail.
the purpose of which is to give you a visual warning that the respective
entry is not yours. Of course, it there are no registered PES Administrators,
this icon will not pop up. In the example in the previous image, we can
see three new icons which will here be explained in detail.
![]() Edit – This icon means that it is possible to edit the
entry
Edit – This icon means that it is possible to edit the
entry
![]() Delete – This icon means that it is possible to delete
the entry
Delete – This icon means that it is possible to delete
the entry
![]() Warning – This icon warns you that the entry is not yours
Warning – This icon warns you that the entry is not yours
By clicking the icon ![]() you will open a new page with a familiar structure, but filled in with
the currently relevant information. If you have changed your mind, and
you do not want to change anything, by simply clicking Cancel
you will return to the previous page. In case you wish to change the contents
of one or more fields, click the relevant field and enter the new contents.
you will open a new page with a familiar structure, but filled in with
the currently relevant information. If you have changed your mind, and
you do not want to change anything, by simply clicking Cancel
you will return to the previous page. In case you wish to change the contents
of one or more fields, click the relevant field and enter the new contents.
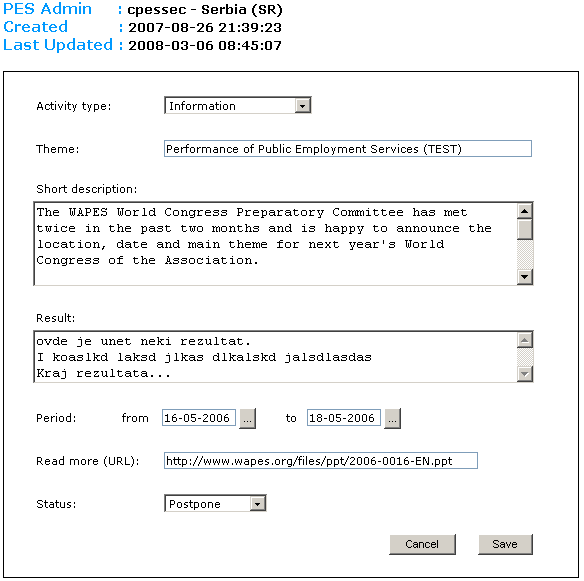
When you have entered the desired changes, click Save
and your changes will be entered into the database. This procedure also
goes for all other implemented data classes. This principle is exactly
the same – the only difference will be in the structure of data.
Delete activity [ Contents ]
By clicking the icon you will open the familiar filled in form, but in a new page. In the top of the page you will see the warnings:
![]()
Below this warning, you will see the familiar form, filled in with the existing data:

If you have changed your mind and do not want to delete this entry, simply click Cancel and you will return to the previous page. In case you after all do want to delete this entry, click Delete.
You will be shown additional warning, as in the following image:
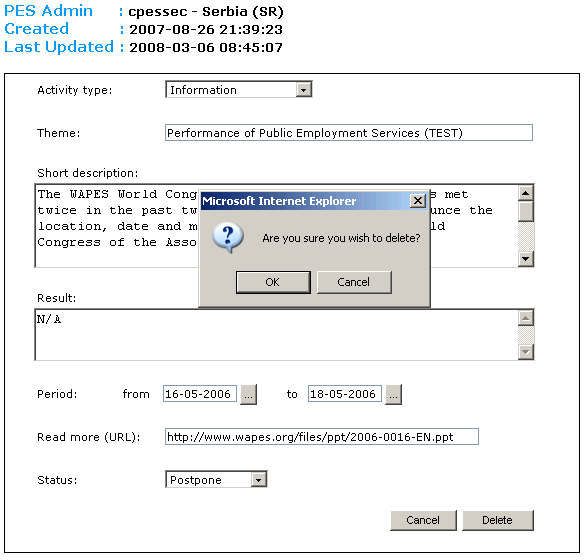
Here you can still change your mind. If you click Cancel you will return to the previous page. In case you have confirmed your decision to delete by clicking OK – the entry will be irrevocably deleted.
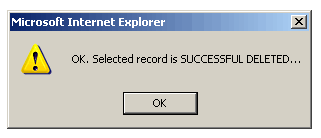 |
You
will be shown a message by which the system confirms that the entry
is successfully deleted from the database. It is enough to click
OK and you will return to CONTROL PANEL. Once again we emphasise
that the entry is irrevocably deleted by this procedure. |
Updating Projects [
Prev ] [
Contents ] [
Next ]
 |
We
will once again use the Select Menu to select the new data class.
If you click Projects, you will be returned to CONTROL
PANEL, but now the focus will be on the Projects, which we have
just selected. If you have previously added a project, you will
be shown the list of all entered projects. Later, when the number
of entries is much larger, we will introduce the possibility for
you to decide by yourself how many projects will be shown in your
page at a time. |
Currently, this is preset to ALL, which means that all projects in the database will be shown. |
|
Add new project [
Contents ]
However, if your database of projects is empty, your page will look more or less like this:
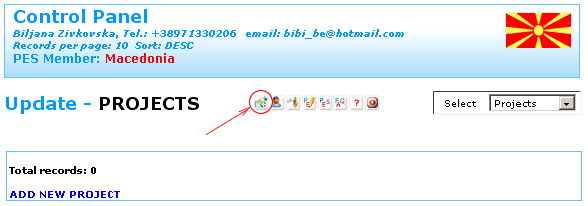
If you wish to enter data about a new project, simply
click the icon ![]() and you will enter the option for entering new data into our database.
and you will enter the option for entering new data into our database.
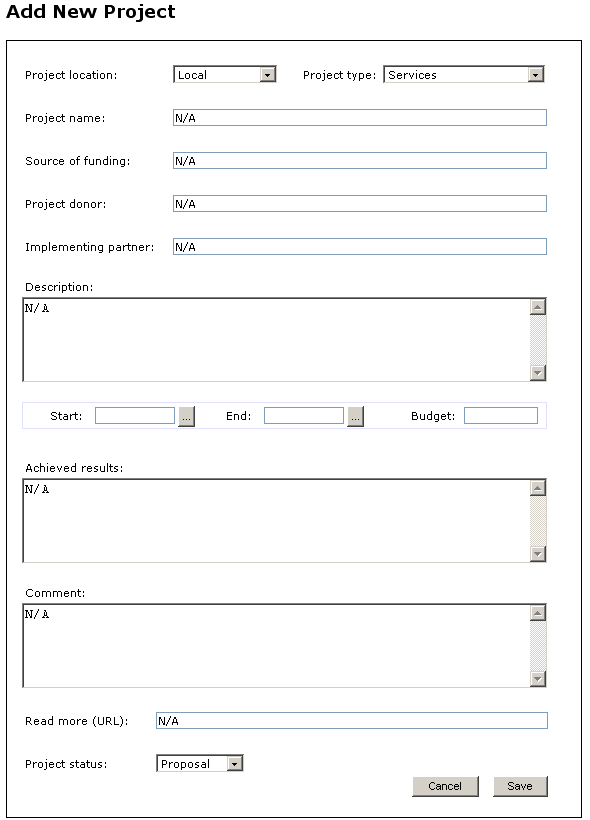
We will here try to give you the summarised explanations for the fields
used in the form, alongside the recommendations for their filling in.
Field: Project location [ Contents ]
 |
This
field is compulsory. By clicking the icon you will open the list
of possible locations that are currently defined for this field.
The content of this set can be expanded and/or changed in the future. |
Field: Project type [
Contents ]
 |
Project
type is also compulsory. By clicking the icon you will open the
list of allowed values that are currently defined for this field.
This set of values can also be modified later. |
Field: Project Name [
Contents ]
This is certainly a compulsory piece of information. Enter the official name of your project here.
Field: Source of funding [
Contents ]
This is another compulsory field. Within this field, state one or more sources of funding of the project. Please note that the system will report an error if you try to leave this field empty. The size of the field is 128 characters.
Field: Project donor [
Contents ]
This field is compulsory. Enter the project donor in this field. The size of this field is 128 characters. If you try to leave this field empty – the system will warn you.
Field: Implementing partner [
Contents ]
This field is compulsory. The size of this field is 128 characters. Enter the implementing partner in project implementation in this field. If you try to leave this field empty – the system will warn you.
Field: Description [
Contents ]
This field is compulsory. It is necessary to enter the detailed project description. You should enter the overall objective of the project, the specific goals as well as their components. The length of entered text is not limited.
Date fields: Project Start and Project End
[
Contents ]
These are date fields. They are also compulsory. The
dates must be entered in the stipulated form: dd-mm-yyyy. The easiest
way to enter dates is to click the icon ![]() .
You will open a calendar, which will help you to accurately set the desired
date (taking into consideration the days of the week).
.
You will open a calendar, which will help you to accurately set the desired
date (taking into consideration the days of the week).
Field: Budget [
Contents ]
This is a numeric type of data. Here you can enter the value of the project in euros. If you do not have the exact value for the particular project in the moment of entry, leave the value 0 which is also the default value. If you enter a negative value, the system will warn you that the entered value is not allowed.
Field: Achieved results [
Contents ]
Here you can enter the results of the project. If at the moment of entry you do not have the precise information, we suggest that you leave the value N/A, which is also the default value for this field. The size of the text is not fixed.
Field: Comment [
Contents ]
Here you can enter some comments regarding this project. The length of the comment is not limited, but the field cannot be left empty. In case there are no comments, leave the value N/A which is also the default value.
Field: Read more (URL) [
Contents ]
Here you can enter a link to a document that is already in the Internet. The type of this field (URL) was already seen in the part where we spoke about Activities. We suggest that you see the description of a similar field in page 15 of this instruction.
Field: Project status [
Contents ]
 |
Here
we are at the last field in the form. This field is related to the
status of the entire project and can have one of the five preset
values. |
If you suddenly change your mind, and you wish to cancel entering a new
project, use the button ![]() .
By clicking Cancel, you will return to the CONTROL PANEL without adding
the new project. In case you wish the entered data to be memorised, click
.
By clicking Cancel, you will return to the CONTROL PANEL without adding
the new project. In case you wish the entered data to be memorised, click
![]() and confirm it. Please note that the project you have entered
becomes visible for all visitors of www.cpessec.org from that moment,
so please be careful.
and confirm it. Please note that the project you have entered
becomes visible for all visitors of www.cpessec.org from that moment,
so please be careful.
Within the CONTROL PANEL, the allowed operations valid for the type of data ACTIVITIES, are also valid for the type of data PROJECTS, the structure of which has just been described in detail. The options of updating and possible deleting the entries of the type PROJECT are carried out in the analogical manner.
Statistics [
Prev ] [
Contents ] [
Next ]
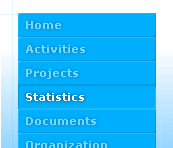 |
The option STATISTICS became operational in September 2009. The layout of the currently available main menu on the presentation is shown on the picture to the left. Upon entering this option, two ready made tables can be seen. TABLE 1 represents MONTHLY REPORT ON EMPLOYMENT, UNEMPLOYMENT AND UNEMPLOYMENT RATE according to current PES members’ statistical data. The data can be presented in many ways. You can select the year you are interested in and then select one of the offered options: EMPLOYMENT, UNEMPLOYMENT, UNEMPLOYMENT RATE and ALL DATA. The example shown in the next picture uses the last option - ALL DATA. |
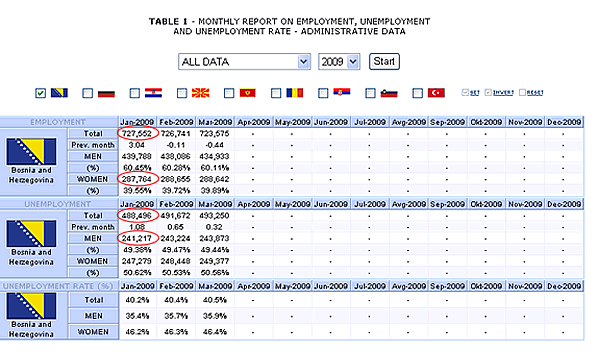
You have the possibility of putting in focus one or
more PES members and showing the statistical data in parallel to one another.
You do that by checking or un-checking individual boxes next to minimized
national flags of the members. Once you have completed your settings and
selected the year of your interest, it is enough to generate the new report
by clicking on Start. Pay attention to numbers in the first column marked
in red. These are the data which you enter in the database. Each column
contains 15 numerical designations. PES Administrator enters only 4 data
items per month. In our example, only EMPLOYMENT TOTAL, EMPLOYMENT WOMEN,
UNEMPLOYMENT TOTAL and UNEMPLOYMENT WOMEN are entered. All other data
are calculated. It is important to mention here that the data Prev.month
depends on the data from the preceding month. If there are no available
data from the preceding month, it is not possible to calculate the value
of this field. If there were no data for DECEMBER 2008 in our example,
it would not be possible to calculate that the change from the previous
month is +3.04%.
On the same web page, below the table already mentioned, there is TABLE
2 presenting ACTIVITY RATE, EMPLOYMENT RATE AND UNEMPLOYMENT RATE - LABOUR
FORCE SURVEY. The layout of this table is shown on the next picture:
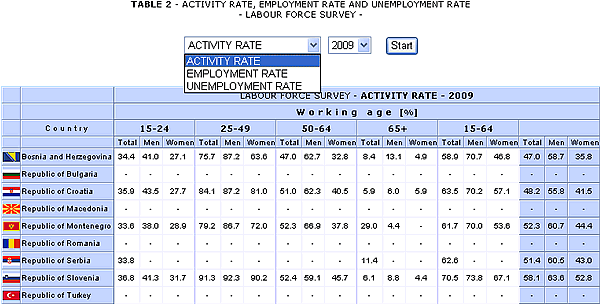
Here you can select one of prepared options to display
data such as ACTIVITY RATE, EMPLOYMENT RATE and UNEMPLOYMENT RATE. Once
you have selected your option, select the year for which you want to view
members' comparative data and generate the report by clicking on Start.
Please notice that, for the time being, the data in this table are displayed
in percentages and rounded to one decimal place. PES Administrator enters
the data rounded to two decimal places in the data base.
We recommend to PES administrators to always double check the data after
entering them. After entering the new data series or changing the existing
data it is also useful to open the web page STATISTICS and view the effects
of the change in tables 1 and 2.
To facilitate the work to PES Administrators, we have tried to fit in
the interface for updating new data class into the existing Control Panel
which has now been expanded to include two new options - Stat TABLE 1
and Stat TABLE 2. Before we move to updating of tables 1 and 2, we'll
say a few more words about changes made meanwhile.
There is now the option OPEN NEW CONTROL PANEL WINDOW on the Control Panel.
By clicking on this option, the Control Panel opens in a new window. Given
that the main menu is also integrated in the Control Panel, you have the
possibility of entering immediately PROJECTS, ACTIVITIES or STATISTICS
and view the effects of changes you have made in the database. If you
no longer need this additional Control Panel, you can exit it by a simple
click on Close (![]() ).
).
Another useful option has been incorporated in the LOGIN form. This is
the option FORGOT THE ADMINISTRATOR'S PASSWORD. If you have forgotten
your password, click on this option. A new form will appear where you
will have to enter your User Name and your current e-mail address. By
clicking on SEND PASSWORD, the system will automatically send you two
passwords. The first one is your password which enables you to register
as administrator. The second password sent by the system enables you to
make changes within the option CHANGE MEMBER PROFILE.
Updating Statistical Data - STAT TABLE 1 [
Contents ]
 |
We will use Select Menu again to select a new data class. If you
click on Stat TABLE 1, you will be returned to CONTROL PANEL but
the focus will be on statistical data STAT TABLE 1 which we have
just selected. We remind that, in this case, we have the statistical
data shown within the option Statistics on the main menu and they
are entitled TABLE 1 - MONTHLY REPORT ON EMPLOYMENT, UNEMPLOYMENT
AND UNEMPLOYMENT RATE - ADMINISTRATIVE DATA. |
If you have already entered data for a specific year, the list of all entered statistical data belonging to TABLE 1 will be displayed. You can control the number of entered data items per page yourself. It is enough to click on the icon |
|
 |
Default values are shown on the picture. These are ALL for the number
of data items per page and ASC for the sorting mode. Each PES Administrator
can adjust data display on the Control Panel to his/her own needs.
|
The field TABLE 1 per Page can have the value ALL for displaying all data of a chosen class or you can enter a specific number greater than zero in case you want to limit the data display per page. The sorting parameter can have designation ASC (ascending) and DESC (descending). Pay attention that the sorting is made by the year in reference. |
|
Adding new data in TABLE 1 [
Contents ]
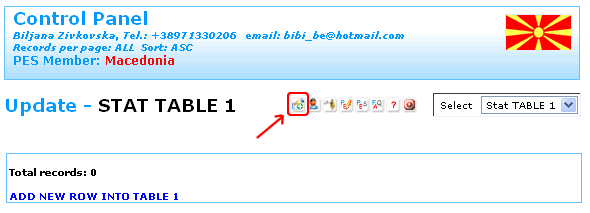
If you want to enter statistical data either for the current or one of previous years, it is enough to click on the icon
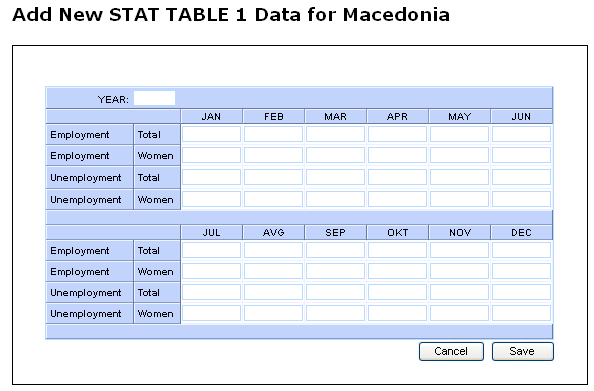
Due to a large number of data items, the data in this form are grouped in two parts. The complete table for an observed year contains 12 x 15 = 180 data items in total. You need only enter 12 x 4 = 48 data items. For each month in a year you enter the series of 4 data items. No field in this form is obligatory except the field YEAR representing the year to which the data apply. However, if the data have already been entered, then you have to obey a few simple rules. Yet another rule applies to data entry for the current year. The system does not allow entering data for the current or one of the following months. For instance: if we try to enter the data for September or November of the current year in September, the system will not allow it and you will receive a warning. A brief description of the fields follows:
Field: YEAR [
Contents ]
This is the only obligatory field in this form. The data is entered as a four-digit number which is greater than or equal to 1990 and smaller than or equal to the current year. If you dispose of data for previous years, you can enter them with 1990 inclusive.
Field: Employment Total [
Contents ]
This field is not obligatory data. It represents the total number of the employed in the reference year and month.
Field: Employment Women [
Contents ]
This field is not obligatory data. It represents the number of employed women in the reference year and month. If this data exists, and if you have filled in the previous field Employment total, then the value Employment Women must be smaller from the value entered in the field Employment Total.
Field: Unemployment Total [
Contents ]
This field is not obligatory data. It represents the total number of the unemployed in the reference year or month.
Field: Unemployment Women [
Contents ]
This field is not obligatory data. It represents the number of unemployed women in the reference year or month. If this data exists, and if you have filled in the previous field Unemployment Total, then the value of Unemployment Total must be smaller from the value entered in the field Unemployment Total.
Updating Statistical Data - STAT TABLE 2 [
Contents ]
 |
We will use Select Menu again to select the next data class. If
you click on Stat TABLE 2, you will be returned to CONTROL PANEL
again but the focus will now be on statistical data STAT TABLE 2,
which we have just selected. In this case, we have the statistical data shown in the option Statistics on the main menu and they are entitled TABLE 2 - ACTIVITY RATE, EMPLOYMENT RATE AND UNEMPLOYMENT RATE - LABOUR FORCE SURVEY. |
If you have already entered data for a specific year, then the list of all entered statistical data pertaining to TABLE 2 will be displayed. Here as well, the sorting mode and number of entered data items per page can be controlled by you. It is enough to click on the icon |
|
Adding new data in TABLE 2 [
Contents ]
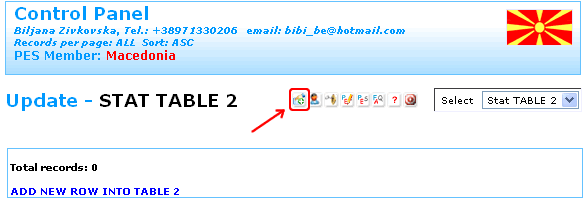
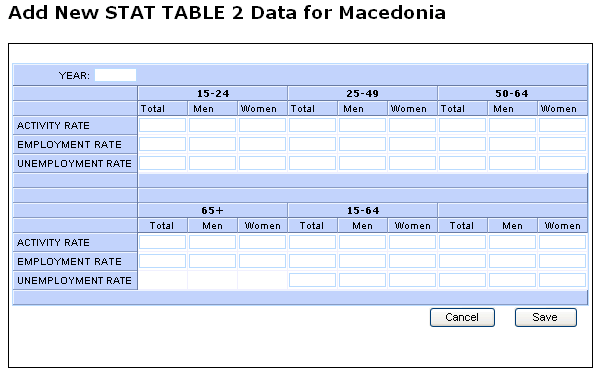
The next page shows the data entry form which appears when your click on the icon
As in the case of other data classes which you can access through CONTROL PANEL options, along with the listed data, the well known icons
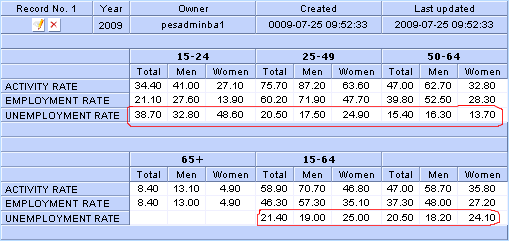
The next picture shows an example of a filled-in table. It is possible to enter numbers in the range form 0.01 to 99.99. We remind once again that decimal point is obligatory. The numbers in the base are memorized with the accuracy of two decimal places. These data are currently shown on the web site rounded to one decimal place. If you have entered the number 18.24, it will be displayed on the site as 18.2. In case you have entered 18.26, an ordinary visitor will be able to see it as 18.3.
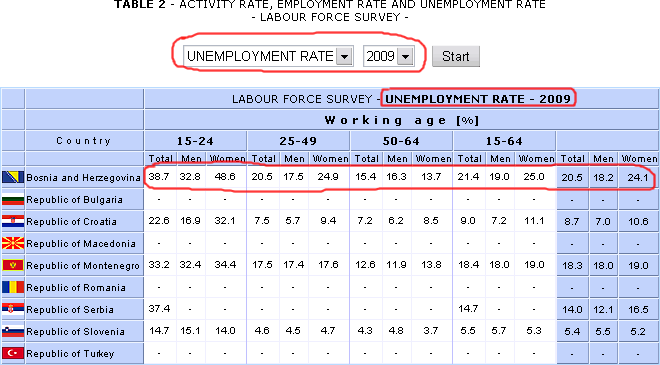
We warmly recommend you to be very careful when entering data in STAT
TABLE 2 and STAT TABLE 1. Ideally, a colleague of yours in charge of statistical
analysis who has provided you with the data to fill in, should double
check the entered data in the end.
Updating Documents [
Prev ] [
Contents ] [
Next ]
 |
Once
again, we will use the Select Menu to select the data class Documents.
By clicking the icon |
Add new document [
Contents ]
However, if your database is empty, your page will look pretty much like this:
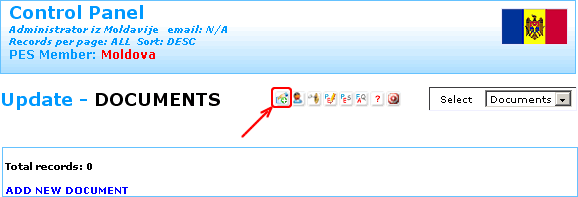
If you wish to enter a new document, it will suffice
to click the icon ![]() and you will enter the option for entering data about the new document.
and you will enter the option for entering data about the new document.
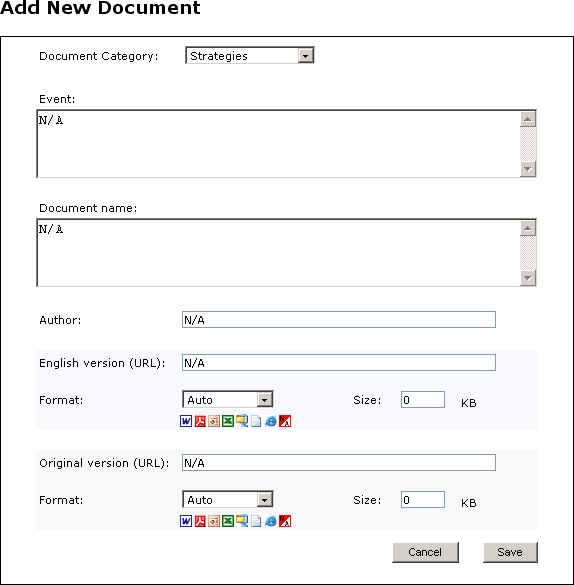
We will here try to give you the summarised explanations for the used
fields in the forms, alongside the recommendations for their filling in.
Field: Document Category [ Contents ]
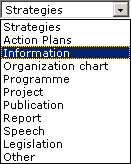 |
We use this field to make the categorisation of documents according to the preset set of values, which is activated by clicking the icon . The visitors of the website www.cpessec.org have the possibility to also sort the available documents by category, for the purpose of easier searching. For that reason, we recommend a careful selection of the category. This set of categories of the documents can also be changed or upgraded in the future. If the current list does not include an adequate category for the document you are entering, you should use the last option in the list – Other. |
Field: Event [
Contents ]
This field enables you to connect a larger group, possibly heterogeneous, of documents by a common event, a conference, seminar etc. If you lack ideas how to connect a document with a certain event, you should simply leave the value N/A, which is also the default value. The size of this field is limited to 240 characters. The filed is not compulsory.
Field: Document name [ Contents ]
This is a compulsory field. You can enter the name of the document is this field, even a short summary. The maximum length of this field is limited to 240 characters.
Field: Author [ Contents ]
You should enter the name of the author of the document. The maximum size of the entered text is 128 characters. In case you do not know the name of the author, you should simply leave N/A, which is at the same time the default value for this field. This field is not compulsory.
The following three fields are related to the English version of the text:

Field: English version (URL) [
Contents ]
In page 15 we have already spoken about the data type
(URL). Everything said on that occasion also goes in this case.
This field is not compulsory. If your document is not yet translated into
English, you should simply go to the fields related to the document written
in your mother tongue. Here is an example of a correctly entered address:
http://www.wapes.org/files/ppt/2006-0016-EN.ppt .
Field: English version Format [
Contents ]
 |
By clicking the icon |
Field: English version Size [ Contents ]
This field is filled in only provided that the URL address of the document is entered. In that case, you should here enter the size of the document given in KB.
The following three fields are related to the original version of the text – written in the languages of the respective members:

Field: Original version (URL) [
Contents ]
Everything that was valid for the description of the field English version (URL) is also valid for this field.
Field: Original version Format [ Contents ]
Everything that was valid for the description of the field English version Format is also valid for this field.
Field: Original version Size [ Contents ]
This field is filled in only in case that the URL address of the document is entered. In that case, you should enter the size of the document given in KB.
If you have changed your mind at one point, and you wish
to cancel entering a new document, you should use the button ![]() .
By clicking Cancel, you will return to the CONTROL PANEL without adding
the new document. In case you wish the entered data to be memorised, you
should click to
.
By clicking Cancel, you will return to the CONTROL PANEL without adding
the new document. In case you wish the entered data to be memorised, you
should click to ![]() confirm it. Please note that the entered document becomes visible from
that moment for all the visitors of the website www.cpessec.org, so please
be careful.
confirm it. Please note that the entered document becomes visible from
that moment for all the visitors of the website www.cpessec.org, so please
be careful.
Within the CONTROL PANEL, the allowed operations for the types of data
such as the ACTIVITIES, which were explained
in detail, are also valid for the type if data DOCUMENTS, the structure
of which has just been described in detail. Operations of updating and
possible deleting the entries of the type DOCUMENTS are carried out in
an analogical
Update the List of Contacts [ Prev ] [ Contents ] [ Next ]
 |
We
will now once again use the Select Menu to select the data class
Contacts. By clicking the icon |
Add new Contact [
Contents ]
However, if your database of contacts is empty, your page will look pretty much like this:
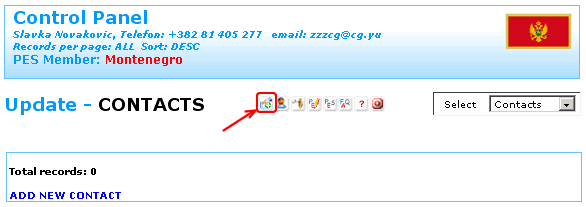
If you wish to enter a new contact, it will suffice to
click the icon ![]() and you will enter the option for entering information about a new contact.
and you will enter the option for entering information about a new contact.
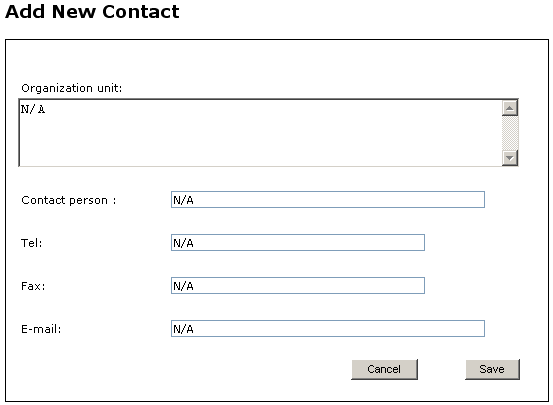
We will here try to give summarised explanations for the fields used in
the form, alongside the recommendations for their filling in.
Field: Organization unit [
Contents ]
Within this field, you should enter the name of the organisational unit – name of the position or occupation. The size of the entered text is limited to 240 characters. This field is compulsory.
Field: Contact person [
Contents ]
Here you should enter the name and surname of the contact
person. The maximum number of the characters is limited to 128. This field
is compulsory.
Field: Tel [ Contents ]
This field is envisaged for entering the phone numbers.
The size of this field is limited to the maximum of 64 characters, which
makes it possible to enter several phone numbers. This field is compulsory
for the purpose of enabling direct contact.
Field: Fax [
Contents ]
Here you can enter the fax number. The maximum size of this field is also limited to 64 characters. This field is not compulsory.
Field: E-mail [
Contents ]
Here you should enter the e-mail address of the contact person. The size of this field is limited to 128 characters. This field is not compulsory. E-mail address must be entered correctly – otherwise the system will report an error.
If you change your mind at a certain stage, and you wish
to cancel entering the new contact, you should press ![]() . By clicking Cancel, you will return to the CONTROL
PANEL without adding the new contact. In case you wish the entered data
to be memorised, you should click
. By clicking Cancel, you will return to the CONTROL
PANEL without adding the new contact. In case you wish the entered data
to be memorised, you should click ![]() to confirm it. In this case, as well, be advised that the contact
you have entered becomes visible from that moment for all the visitors
of the website www.cpessec.org, so please
be careful.
to confirm it. In this case, as well, be advised that the contact
you have entered becomes visible from that moment for all the visitors
of the website www.cpessec.org, so please
be careful.
Within the CONTROL PANEL, the allowed operations that are valid for the
type of data ACTIVITIES (which was explained
in detail), are also valid for the type of data CONTACTS, the structure
of which we have just described. The options of updating and possible
deleting the entries of the type CONTACTS are carried out in an analogical
manner.
End of Session - Logout [ Prev ] [ Contents ] [ Next ]
We are at the final stage of this instruction. For that reason, it is quite natural that we left this topic for the very end.
 |
There is only one place where you can logout CORRECTLY – and thereby mark the end of your session. This is the option logout, which we have described discussing the set of options in block – E. |
Moreover, we have also stated that the time of one session
is preset to 3600 seconds. In case you leave the application correctly,
by simply clicking the icon ![]() you can log in again in a few minutes, or in a couple of days –
it is totally up to you and your needs.
you can log in again in a few minutes, or in a couple of days –
it is totally up to you and your needs.
However, in case you do not log out correctly, without logout –
but instead by clicking ![]() ,
this will produce unwanted effects. Depending on the time when you are
trying to log in again, the effect can be relatively mild. If more than
3600 seconds have passed since your previous login, you will be shown
the following message:
,
this will produce unwanted effects. Depending on the time when you are
trying to log in again, the effect can be relatively mild. If more than
3600 seconds have passed since your previous login, you will be shown
the following message:
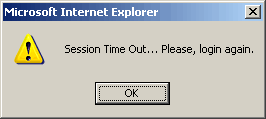 |
After that, you should
only click OK and try to log in again and the problem will be
solved with no major consequences. |

This means, in the example given, that you will have to wait until the remaining 40 minutes of the session have expired in order to be allowed by the system to log in again.
THE
SIMPLEST WAY TO AVOID THIS UNPLEASANT SITUATION IS TO LOG OUT IN
A CORRECT MANNER BY USING THE ALREADY DESCRIBED ICON |
PROJECT REALISATION [ Prev ] [ Contents ]
1. |
Ms Jadranka Dimov | Manager of the Centre for Projects |
2. |
Ms Zeljka Vukovic-Zelenovic | Head of the Department for Project Development, Coordination, Monitoring and Evaluation |
3. |
Ms Natasa Simsic | Officer in the Department for Project Development, Coordination, Monitoring and Evaluation |
4. |
Ms Tijana Mitovski | Officer in the Department for Project Development, Coordination, Monitoring and Evaluation |
5. |
Ms Tatjana Savov | Head of the Department for Harmonisation with EU Regulations and International Cooperation |
6. |
Ms Djurdjica Sucevic | Officer in the Department for Harmonisation with EU Regulations and International Cooperation |
7. |
Ms Vesna Bosanac | Officer in the Department for Harmonisation with EU Regulations and International Cooperation |
8. |
Mr. Veljko Sretenovic | Translator |
9. |
Mr. Bojovic Bozidar | Web Administrator |
10. |
Mr. Mirko Zagar | Web Project, Web Design, Web Programming |